The other day, I uploaded this creation to my Flickr photostream and a number of my friends asked for instructions on how to make it. So without further ado.... here you go!
First you'll need a 3x6 brick. As far as I know LEGO hasn't made this piece yet.
So I made one out of various plates.
Next I'll add more texture to the underside, this step consists of one 1x6 and three 1x2 plates placed as shown.
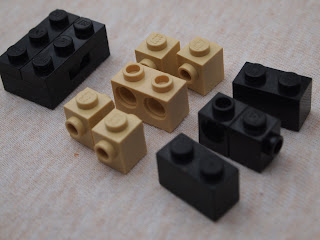
Next you'll need these bricks, a 2x3 (I made one out of plates) 4 1x1 bricks with a stud on two sides, two 1x2s and one headlight brick and and one 1x1 brick (I used a pin-hole brick, but this is not neccesary.)
Add these bricks and one 1x2 plate, it will be important in a later step.
Next add the legs as shown, I used 4 1x1 cone pieces and 4 1x1 round plates.
Now for the rear above are the pieces you'll need. (I used a jumper plate sort of by accident... a 1x2 plate would work the same.)
And attach them as shown.
Then you attach this group of pieces to the one headlight brick at the back.
Next, gather these assorted pieces: two 1x3 plates, one 2x3 plate, two sideways clamps, one vertical clamp, and one 1x3 slope piece.
Start attaching the pieces as shown.
The finished product should look like this.
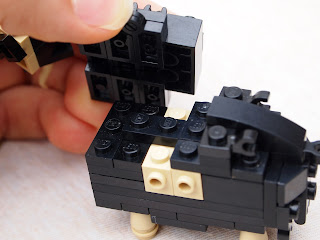
And then you attach it to the main structure as shown.
This next part is slightly complicated. :) You will need four 1x1 upright clamp pieces, one 2x3 brick, one 1x4 plate, three jumper plates, two vertical clamps, one 1x2 upright clamp, one 1x1 plate, (it's grey in the picture)
two 1x3 plates, one 1x2 grilled cheese slope, one sideways clamp, and two 1x4 bendable plates (two 2x2 plates will work fine too.)
Begin attaching the pieces as shown.
The finsihed part should look exactly like this.
Next we'll work on the head.
You will need one 1x4 bendable plate two tan 1x1 round plates for the nostrils
you can use two 1x2 plates or one 2x2 plate for the jaw. (The tan pieces)
you will also need two headlight bricks so you can attatch...
...The two jumper plates, be sure they are attached in the center of the piece so they have the right shape. And add a plate with a bar attachment on the top, as shown.
for extra detail I added a black plume on a vertical clamp...
...And attach it to the jaw as shown.
Next I'll add the horns. I used brickwarriors horns, but LEGO ones should work okay too.
And then I'll attach the head to the shoulder part by the clamp piece.
And attach all of that to the main chunk. :)
It's starting to look like a Musk Ox! :)
Next the sides.
the base is a 2x6 plate with 2x2 plate and a 1x2 plate on that with a 1x1 round (square would work) plate next to that on the other side we have two grill tiles attached to both the 2x6 plate and another 1x2 plate.
I attached all the clamp pieces to the bottom half ...
and then I added the grill tiles as shown above.
Next I'll build the inverse of this using the exact same pieces. :)
Then simply stick them on the sides.
And Ta-da! You have a beast ready for war, work, or the wild! :)
Thanks for taking the time to look through this!
-Steven


